What exactly is the X-Robots-Tag or Robots Header tag? These tags represent your website to search engines such as Google, Bing, and Yandex, among others. When a website is crawled by a search engine bot, the X-Robots-Tags or meta tags specify page-level settings by including HTTP header responses or including meta tags on HTML pages.
If you want to enable custom robot header tags for Blogger, read the entire article to learn how to do so.
Header Tags and Purpose for Custom Robots
In Blogger, you will encounter the following custom robot header tags.
- All: Indexing and serving are both unrestricted. Crawlers are not bound by any constraints if this tag is set. They have complete access to crawl, index, and expose your content.
It should be noted that this directive is the default value and has no effect unless explicitly specified.
- Noindex: This page should not be displayed in search results.
Very Important Note: Do not tick the noindex checkbox until and unless you are sure about it because doing so will pull your website off from search engine result pages.
- Nofollow: Do not follow any of the links on this page.
Outbound links use the nofollow and dofollow tags. If you don’t want search bots to crawl your links, adding a nofollow tag should help.
- None: Noindex, nofollow are synonyms.
Crawlers will not index your pages and will only skim through the links.
- Noarchive: On SERPs, you may have noticed a cached label with the majority of the website links. It indicates that Google has saved a copy of your site on their server to display in the event that it goes down. Having said that, the noarchive tag disables the cached version of search pages.
- Nosnippet: In the search results for this page, do not display a text snippet or a video preview snippet.
- Noodp: Do not use Open Directory Project metadata for the titles or snippets on this page. This tag is no longer in use.
- Notranslate: In search results, do not include a translation of this page.
- Xnoimageindex: People may steal your images and use them on their own websites if you allow Google to index them. To avoid this, use the noimageindex tag to keep the images deindexed.
- unavailable_after – In Blogger, you’ll find a field dedicated to this tag. As a result, the webpage will be deindexed after this period of time.
Who should enable the Blogger blog’s custom robots header tags?
Before making any changes to the Blogger blog settings, we must first determine who should and should not have these custom robots header tag setting enabled.
Who shouldn’t have this tag option enabled on their blog?
- There is no need to enable this feature if you are running a simple blog: This feature allows you to customise the Blogger blog’s index of posts or pages. If you want to boost the SEO of your Blogger website, you can use;
- txt and robots meta tags combination,
- adding meta tags to the Blogger theme, and
- writing SEO-friendly content for the Blogger blog.
Who should enable and make use of these tags on their blog?
- You don’t want to change the way pages are indexed.
- Some pages should be indexed.
- Images from some pages are not to be indexed.
- The website’s content is no longer appropriate after a certain date or time.
- If you do not want some pages to be translated.
- Allowing some pages to be indexed in search results is not permitted.
How do I make custom robots header tags visible?
To enable these tags, you must first log into your Blogger dashboard.
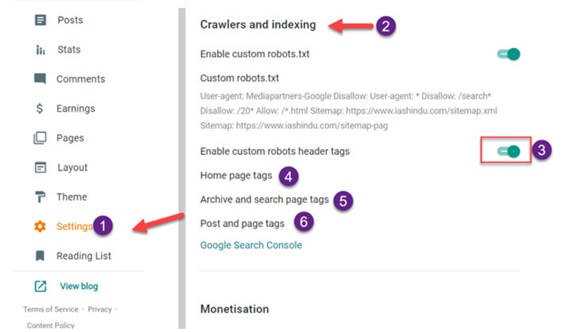
Step 1: Open the blog’s settings.
Step 2: Scroll down to the crawlers and indexing option.
Step 3: Turn on the “Enable custom robots header tags” setting.

Step 4: Home page tags: When you click on this, the option shown in the preceding image will appear. You must select all and save the settings.
Step 5: Archive and search page tags: choose noindex from the options listed above.
Step 6: Posts and Pages type: To index all pages, select “all” and then click the enable “all” button. After that, save the settings.
As previously stated, there is no need to enable the noodp tag.
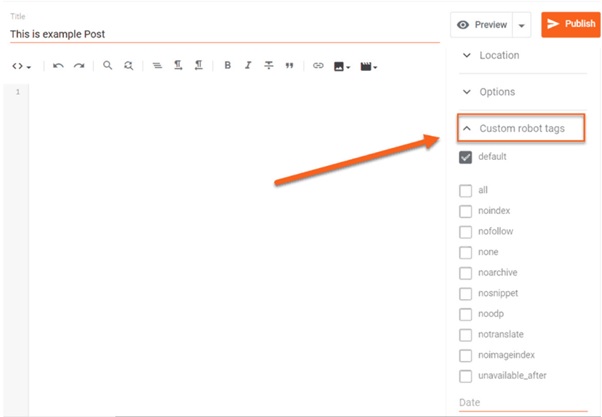
When you enable custom robots header tags, you will be able to set custom header tags for each page and post. As a result, you can select the appropriate robots header tags.
The image above shows the Blogger blog post settings. As you can see, there is now a custom robots tag option available in the post’s sidebar. If you enabled custom robots header settings for the simple blog, leave the rest of the settings alone.
Conclusion:
Custom robot header tags are extremely powerful, whether you believe it or not! Why not maximise its use if Google can provide a ready-made setup with a single click of a button?
We guarantee that if you use these configuration settings in conjunction with best Blogspot SEO Practices, your blog’s rank will improve.
I hope you found this post useful. Please leave any questions or comments about the preceding article in the section below. We will gladly help you.